

In this article I will show you how to create file upload progress bar in Angular, using Semantic UI and XHR.
I will assume that you are familiar with NPM and Angular ecosystem, so I will not go into details about it.
Creating Angular Project:
By typing this command in your terminal, Angular CLI will generate new project.
$ ng new progressbar-app
If project was created successfully, folder first level structure should be like this:
├── angular.json
├── e2e
├── node_modules
├── package.json
├── package-lock.json
├── README.md
├── src
├── tsconfig.json
└── tslint.json
Semantic UI:
Semantic is a development framework that helps create beautiful, responsive layouts using human-friendly HTML.
Install Semantic UI with NPM using this command:
$ npm install --save semantic-ui
This will automatically install Semantic UI inside semantic folder on top level of your project (e.g. /progressbar-app/semantic)
Gulp:
Gulp is a cross-platform, streaming task runner that lets developers automate many development tasks. At a high level, gulp reads files as streams and pipes the streams to different tasks. These tasks are code-based and use plugins. The tasks modify the files, building source files into production files.
We will need Gulp only in development environment to build Semantic UI components and packages. It will be installed with next command:
$ npm install --save-dev gulp
When gulp is installed, navigate to semantic folder and run gulp build command.
progressbar-app/semantic$ gulp build
Now gulp will build components and themes inside semantic/dist folder. Also, it will create semantic.css and semantic.js files which will be used later.
jQuery:
jQuery is a JavaScript library designed to simplify HTML DOM tree traversal and manipulation, as well as event handling, animation, and Ajax.
Semantic UI depends on jQuery, so we will install it with the next command:
$ npm install --save jquery
To make Semantic and jQuery working in our application, we need to register them in angular.json file. Make sure that styles and scripts arrays look like this:
"styles": [
  "src/styles.css",
  "semantic/dist/semantic.css"
],
"scripts": [
  "node_modules/jquery/dist/jquery.js",
  "semantic/dist/semantic.js"
]
Note: It’s very important to keep jQuery as the first element in scripts array.
If you set semantic.js first, it will try to load jQuery (which is not loaded yet) and you will get the error.
Now we are ready to write some code!
Create folders/files which are bold on this tree:
├── app.component.css
├── app.component.html
├── app.component.spec.ts
├── app.component.ts
├── app.module.ts
├── app-routing.module.ts
├── modules
│   └── shared
│       ├── progressbar
│       │   ├── progressbar.component.html
│       │   └── progressbar.component.ts
│       ├── shared.module.ts
│       └── upload-file
│           ├── upload-file.component.html
│           └── upload-file.component.ts
└── services
    └── file.service.ts
File.io API will be used for uploading files.
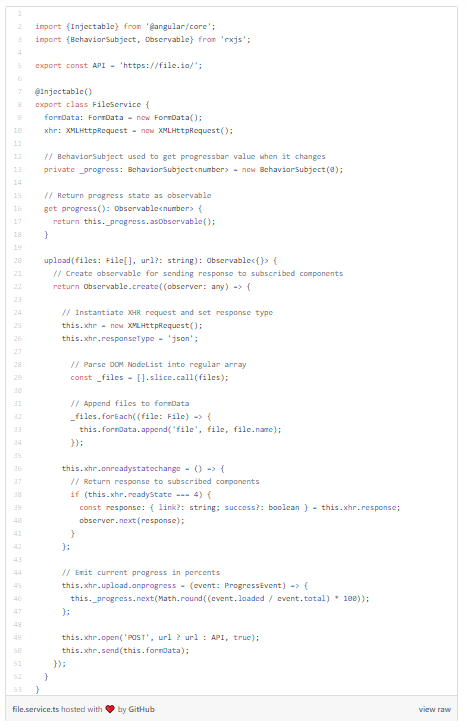
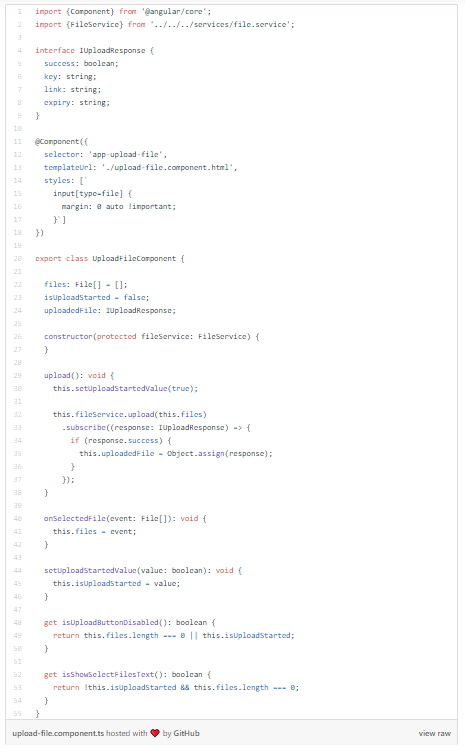
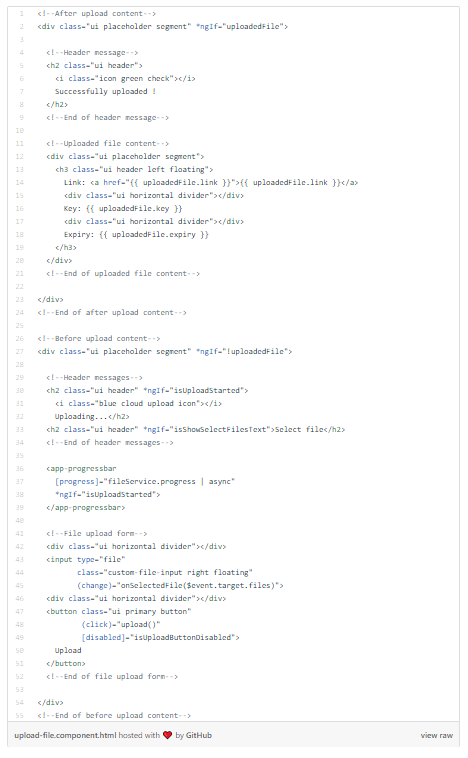
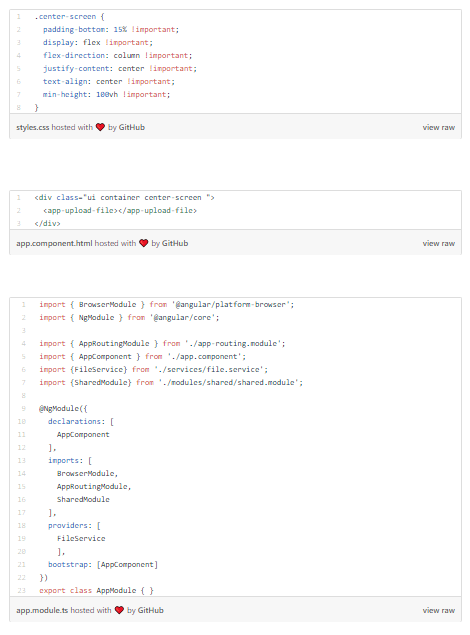
Now make sure that your files look like files listed below (file name is written in the bottom left corner of code snippet):
In file service, we will use XHR for creating requests to API server.
XHR provides us information about the current state of the transaction. We will use it to get a percentage of file upload.
You can read more about it on this link.
If you did all mentioned above, final result should be like this: